 Mobile
 PC
PC
 Full-Cycle
 Co-Development
 Outstaffing

-
 Unity Game Development
 Jan 21st, 2021
- Share:
Do you want to avoid sifting through a disorganized mess in your Unity project? Keeping your project organized is essential for efficient development and collaboration. In this article, we will explore seven effective ways to maintain order and structure in your Unity project, ensuring smooth workflows and improved productivity.
From naming conventions to streamlined unity folder structures and asset organization techniques, we will delve into practical steps you can take to keep your project clean and clutter-free. We’ll also delve into the power of version control systems like Git, which can save you from potential headaches when working on a team.
Let’s dive right in and discover the seven ways to keep your Unity project organized.
Importance Of Organizing Folders
Maintaining an organized and well-structured Unity project is crucial for several reasons.
Firstly, it allows for easier navigation and understanding of your project’s structure. When your project is well-organized, you can quickly locate specific assets, scripts, or scenes, saving you valuable time and effort.
Furthermore, a tidy project reduces the risk of errors and conflicts. When collaborating with others, a clear organization system ensures that everyone understands where to find and modify assets. It minimizes the chances of overwriting each other’s work and makes merging changes much smoother.
Lastly, an organized project improves your overall productivity. With a clear structure in place, you can focus more on creating and iterating your game or application rather than getting lost in a sea of disarray.
How to Keep Your Unity Project Organized?
1. Folder Structure For Unity Projects
The directory or folder structure is quite essential for a well-organized Unity3D project. In Unity, you can place or name files according to your needs. And this freedom is what creates the entire mess. Here’s a basic template showing how an organized directory should look like: –
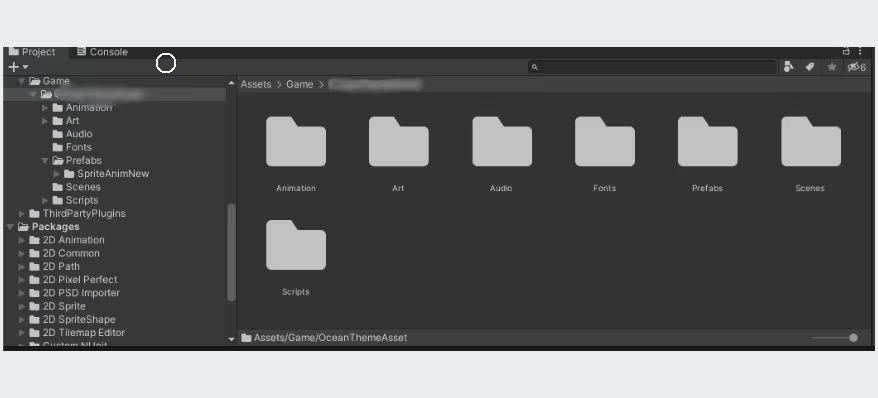
Please keep in mind the above structure is a template. You can make it similar to this one, but it does not need to be identical.
What are some points you have to keep in mind while managing the Unity folder structure/ directory?
-
Omit spaces in file names:
Make sure that you never use spaces in folder or file names. It’s because Unity3D never processes paths with spaces on its own. Instead, write a command to do so.
-
Avoid storing assets in the root directory:
The root directory is not where you can dump anything. So, use subdirectories to store assets instead of root directories.
-
Use the ‘Sandbox’ directory for experiments:
If you’re making some changes you aren’t sure about, make it in Sandbox. In Sandbox, the structure doesn’t matter. You can create a personal Sandbox subdirectory like ‘Sandbox/your name.’ And once you’re sure about the changes, you can move the data to the actual project.
-
Try to use the same folder structure for all Unity projects:
Once you have finalized a folder structure, follow the same structure throughout the entire project. You can do this with the Editor script to copy the template and reuse it as many times as you need, moving forward with the project. It helps you prevent your work from mixing up with third-party files.
-
Avoid creating ‘Empty folders’:
By default, empty folders are ignored. Until you place something in these empty folders, you might not be able to execute them. Also, it creates issues in the version control system. Otherwise, you can place a .keep file in empty folders to commit them to the project folder.
2. Naming Convention
Using a specific naming convention will make accessing project folders easier. Here, we have listed a few of the standards that might be helpful for you.
- Always use descriptive names and avoid abbreviations. (Others might not understand it.)
- Using Camel case/ Pascal case will help improve readability.
- Don’t use underscores very often.
- Employ number suffixes to indicate a series (Eg, Model1, Model2, Model3, etc.)
- Use the exact spelling in the design document to avoid any confusion.
If you already follow a specific standard while naming files, continue to do that. The motive here is to be consistent with the file names.
3. Managing the Scene Hierarchy Structure:
Similar to the project hierarchy, there’s a scene hierarchy you need to follow. Here’s a template of a well-organized scene hierarchy structure: –
- World
- Lights
- AR_Manager
- Cameras
- _Dynamic
- GUI
- Scene_Manager
According to your ease, you can alter this structure, just like the project structure.
What points do you need to adhere to while managing scene hierarchy?
- Put objects instantiated during runtime into the ‘_Dynamic’ folder: It’ll help you easily navigate the files.
- Use empty game objects as scene folders: You need to organize the scenes carefully. It is done in order for you to find the objects when you’re looking for them.
- Make sure that your project can run from every scene: When every scene becomes runnable, you won’t have to spend much time testing. It’ll be more convenient to test the application.
4. Get Familiar with Version Control Systems or VCS:
You must learn version control software like GIT, SourceTree, or Subversion. Such version control systems are much more than you think. It is not only used to create a backup or sync, but you can also use it to stash unwanted changes.
Say, you’re using GIT and working on the master branch. And you’re unsure of what some code might do to your code. Or you simply want to test that code later on. In such cases, you can stash the unwanted block of code.
Now, you can work on that code whenever you want without disturbing the master branch. Amazing, right?
You also don’t need to comment on large chunks of code you don’t want. If you use a VCS or version control system, you can access the previous version where the code was intact. This way, you can avoid chunks of commented code. It’ll make your code look clean.
5. Use Prefabs More Frequently:
If you can, use prefabs for everything. Using prefabs, you can easily share pre-configured project hierarchies. Prefab is a fully configured reusable object that can be shared between scenes and projects. It is pretty helpful when you want to add functionality to 100 scenes at a time.
Let’s say you need to add a camera effect to 200 levels. Now, if you have a camera prefab, it’s easy. You need to add a camera effect to the camera prefab, and you’re done. It’ll provide the functionality to each level regardless of the count.
6. Get Familiar with Editor Scripts:
Unity is an extensive game engine. And to leverage it, you need to learn editor scripts. Editor scripts are commands or pieces of code to alter the functionality of a Unity editor. You can create scripts for: –
- Downloading files directly from the Google Drive folder
- Compressing all the files in a folder and storing them in a secure place
- Arranging all the objects in a scene
If you need more insights about creating an editor script, please refer to this.
7. Learn and Implement Defensive Programming:
Defensive programming, in simple terms, is a way of coding defensively. Using defensive programming, you ensure that your software works under unforeseen circumstances. It’s usually followed when you deal with something that can be misused.
- Whenever you write the base class (MonoBehaviours) in Unity, make sure that: –
- You set all the references
- There’s no required component missing
Use ExecuteInEditMode and #if UNITY_EDITOR to perform checks before you play or run a scene.
8. Try In-Game and/or In-Editor Cheats:
Now, this is something interesting. Once you learn how to write editor scripts, try adding in-editor cheats. You can add the functionality of unlocking secret levels to the user or something similar. You can write cheats that allow you to: –
- Add or reduce time/Lives or coins
- Unlock secret characters or levels
- Give immortality to your character
- Do anything that helps you with testing.
Conclusion
Following Unity’s good practices is essential for efficient development and collaboration. By following the multiple ways discussed in this article, you can create a well-organized project that saves you time, reduces errors, and enhances your overall productivity.
From establishing a logical unity folder structure to implementing naming conventions for assets and scripts, each step contributes to a cleaner and more manageable project. Utilizing version control, prefab management, tags, and layers further enhance organization and collaboration.
Remember to organize your scripts effectively, optimize scene management, and adopt proper debugging and error-handling techniques to ensure a smooth development process.
By prioritizing organization in your Unity project, you set yourself up for success and allow your creativity to flourish. So, take the time to implement these tips and enjoy a clutter-free, efficient Unity game development experience.
Frequently Asked Questions
An organized unity project will ensure smooth collaboration, faster development, and easier debugging. It will help to reduce frustration, improve documentation, and encourage best practices.
Absolutely. Using Unity Engine for game development is much easier than using other game engines. Moreover, they have numerous resources and an extended community of developers who aid in learning and problem-solving,
Folder structure, Naming conventions, and setting up version control systems are the three best practices in maintaining an organized Unity project.
Related Posts

A Practical Guide to Unity Game Development in 2026
Unity still matters in 2026 because it sits at the intersection of speed, scale, and accessibility. If you’re building for mobile, experimenting with live features, or shipping across platforms without overextending your team, Unity game development remains one of the most practical paths forward. That relevance is reflected in the broader engine economy as well.

Top 10 Unity Game Development Companies in 2026: Global Studios Reviewed and Compared
If there’s one engine that has quietly reshaped how modern games are produced, it’s Unity. Built for both creativity and scalability, Unity enables studios to build once and deploy everywhere, reducing costs, accelerating delivery, and empowering teams to focus on innovation instead of infrastructure.

Unity 3D Game Development: Why Leading Studios Choose Unity for Scalable Production in 2026
Engine selection in 2026 defines production velocity, platform reach, hiring structure, and long-term scalability. Unity 3D game development powers mobile ecosystems, cross-platform launches, hybrid 2D/3D pipelines, and LiveOps-driven roadmaps for studios operating at scale. Leading teams choose Unity because it aligns technical flexibility with production efficiency.