 Mobile
 PC
PC
 Full-Cycle
 Co-Development
 Outstaffing

-
 iOS Apps & Games
 Mar 25th, 2021
- Share:
Table of Contents
Mobile gaming is prevalent, irrespective of your device and operating system. With the global market share of iOS devices being approximately 28.8% till December 2023, it is the second most popular choice after Android. As a result, iOS game development is a profitable venture for game developers.
Unity is one of the most popular choices to design iOS games. Many popular iOS games like Forgotten Anne, Alto’s Adventures, Hitman Sniper, etc. were built using the Unity game engine platform.
Unity is the most popular game engine in the world. Many beginners and experienced mobile game developers worldwide prefer the Unity game engine over others because of its many developer-friendly features and interface.
Read on to learn in-depth about the intricacies of Unity iOS game development for beginners.
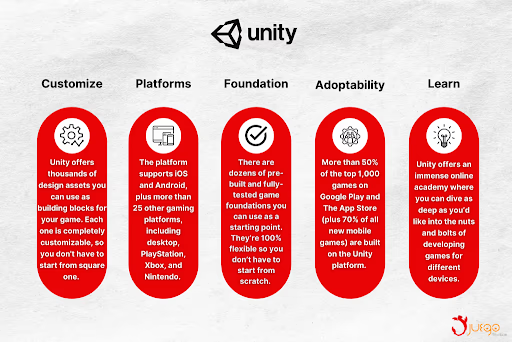
Why Choose Unity for iOS Game Development?
The following infographics provide in a nutshell the advantages of Unity game development for iOS platforms:
Step-by-Step iOS Game Development
The first step towards Unity iOS development is setting up Apple developers’ accounts. After the account is set up, the developers must tweak the settings and customize the buttons and Unity engine version as per their requirements. You can soon get started by clicking “Create Project” which will lead to the editor window.

Here are the different steps in detail for beginners in iOS game development companies to streamline their learning process.
Before you begin, ensure you have the following:
A Mac Computer:
Xcode, Apple’s integrated development environment (IDE), is essential for iOS development and is only available on macOS.
Apple Developer Account:
Register for an Apple Developer account to access iOS SDKs and tools necessary for iOS app development.
Unity Hub and Unity Editor:
Download and install Unity Hub. From Unity Hub, install the latest version of the Unity Editor with iOS build support.
Xcode:
Download and install the latest version of Xcode from the Mac App Store.
An Apple Developer Account lets the professional use the Unity game development engine’s platform’s ability to the fullest. From establishing your provisional profiles to adding devices, many functions are performed through Apple’s Developer Website.
Steps to set Unity iOS development
The following steps are to be followed to make an iOS game:
- Under the Unity Hub, select the Installs button and choose the appropriate version of the Unity game engine.
- Click the three little dots available to the right and choose – Add Component.
- Select iOS build support if the game is to be created in an iOS operating system.
- Click on Next. It contains SDK as well as NDK tools which are needed to create a complete game on the iOS platform.
- Click Done and wait for the installation.
- Come back to the window containing Projects, Learn, and Installs.
- To the right side, choose New to create a new Unity project. Enter the Project Name, Unity Version, and Template.
- Choose -Create Project- and get inside the Editor.
- Once inside the Unity Editor platform, convert it to iOS.
- Go to the Files in the left corner on top of the screen.
- Choose Build Settings and from that window, choose the iOS platform by scrolling down.
- Click on the Switch Platform after selection.
How to Prepare the Unity Editor for iOS game development?
It is crucial to create the right settings to streamline the iOS game development process. Here are a few things game developers can do to make it simpler to create any type of iOS game:
Choose the Right Unity Version
Opt for a stable release for your first project, avoiding the latest beta versions unless comfortable with potential bugs. Consider the project’s complexity and choose a version with suitable features. Download the appropriate installer for your operating system (Windows, Mac, or Linux).
Organizing the Unity project
This includes steps like adding folders, different aspect ratios, importing some assets, and setting up a scene to go over touch inputs and gestures required for the new game project.
Choose three new Folders by right-clicking from the Assets under the Unity Editor. Name the folder as Materials, Scripts, and Prefabs. Particle effects can be added to the Prefabs folder later. Try to drag a bunch of different 3D model assets to experiment with later on.
Optimize Your Project Settings
Open the Project Settings (File > Build Settings > Player). Set the platform to “iOS”.
Define important details like company name, product name, resolution, and orientation. Configure icons and splash screens for your game. Go to “Other Settings” and set a unique bundle identifier for your app.
Here are a few crucial tips to note that will help streamline the development process:
- Familiarize yourself with Unity’s online documentation and tutorials for iOS development.
- Explore the Unity Asset Store for pre-made resources like models and textures.
- Join online communities and forums to connect with other iOS developers and get support.
- Keep updated with the latest Unity and Xcode versions for improved compatibility and features.
Let us delve into the details of different aspects of Unity iOS game development using the Editor:
Lighting
Lighting is a crucial part of rendering an aesthetically pleasing and engaging game. In the Unity engine, developers can enhance the lighting through its specific tab. To the right of the Inspector Tab, Lighting Tab can be found.

This will help enhance the color of the component created by changing the Environment, Lightmapping Setting, Mixed Lighting, and Realtime Lighting or click on Auto-generate at the bottom for ease and then choose Generate Lighting.
Material creation
Under the Assets, create a new material by choosing it from the Materials folder. For instance, if Ground is the material you want to create, you can change the composition based on color and other settings. Try to cross-check the created assets and materials in the Game view to find out whether your expectations have been met or not. Choose the view based on changes in the Camera component of the Inspector tab to the right.
3D object creation
Set up a basic scene in the Scene section of the Unity Editor. After that right-click to choose 3D objects and choose a shape. Upon choosing a shape, for instance, a Cube, its parameters will appear on the right side under the Inspector tab. Make changes based on your requirements by choosing from Transform, Mesh Render, and Box Collider. Click on Add component once the shape is chosen.
Adjusting Aspect Ratio
One can change the aspect ratio and resolution for the game through the Unity Editor. This is to make sure that the game objects, materials, and other assets created are visible on all different platforms of Apple devices like iPad and iPhone. Choose the Game tab on the Unity Editor and click on Free Aspect to make changes based on your needs.
Addition of Touch Inputs
You can write codes for more complicated color and touch schemes inside the Visual Studio. Zoom gestures, Drag gestures, etc can also be added to the game based on a similar procedure. The following are the steps to do so:
- Go to the Scripts folder and click on right-click. Make a selection to choose Shades. Create a new C# script based on the requirements of the game.
- For instance, if you want to change the colors of the objects when they are touched, go for the name: Color changer.
- Attach the newly created script to the main camera. Open the new script inside Visual Studio.
Add the function that you need.
Creating Orientations
Creating orientation helps to decide the orientation we want inside the app for the game: Portrait or Landscape.
- This will enable the building of mobile inside Unity for iOS devices.
From the Unity Editor, choose Edit. - Choose the Project setting from the dropdown. In the Project setting window, choose the Player option.
- Enter the Company Name and Product Name. Go down to the Resolution and Presentation option.
- From this, select -Allowed Orientations for Auto Rotation option.
Working With Xcode
The next step is to download an app called Xcode available on the app store. It is a compulsory step to build games for the iOS platform. Xcode is Apple’s IDE for macOS, used for developing software for macOS, iOS, watchOS, and tvOS.
Installing and Setting Up Xcode
The game developers must sync Xcode and Unity to design any type of video game for the iOS platform. The following steps are a comprehensive guide to installing and integrating Xcode for Unity game development:
- Download Xcode from the Mac App Store and install it.
- Launch Xcode and agree to the terms of service. It may prompt you to install additional components; allow it to do so.
- Open Xcode preferences (Xcode > Preferences).
- Navigate to the Accounts tab and log in with your Apple ID.
- In the same preferences window, you can configure text editing, key bindings, and other preferences according to your comfort.
Building and Running Your Unity Game in Xcode
Once Unity and Xcode are configured, you can build your game in Unity and run it through Xcode on an iOS device or simulator.
- In Unity, go to File > Build Settings.
- Ensure iOS is selected and click on Build.
- Save the build. Unity will generate an Xcode project in the specified directory.
- Open the generated Xcode project. Navigate to the folder where you saved your build and open the .xcodeproj file.
- Select your project in the Project Navigator.
- Set your development team under Signing & Capabilities.
- Choose the correct provisioning profile and certificate.
- Run Your Game on a Device or Simulator
- Connect an iOS device to your Mac or use the iOS simulator.
- Select your target device or simulator from the scheme toolbar menu.
- Click the Play button or press CMD + R to build and run your project.

Tips for troubleshooting common problems in iOS game development
While setting up Xcode for Unity iOS game development, you might encounter issues. Here are some troubleshooting tips:
- Provisioning Profile Issues: Ensure your Apple Developer account is active, and you have the correct provisioning profiles.
- Build Errors in Xcode: Check the error log in Xcode for detailed information. Common issues may be due to outdated Unity/Xcode versions or misconfiguration in build settings.
- Performance Optimization: Use Unity Profiler and Xcode Instruments to profile and optimize the performance of your game.
Game Testing Before The Launch
You can build as well as test your app in the Xcode. Submit the game to the Apple certification team for review. If your game app clears all the parameters, your game will be live in the App Store in 24 hours. The following are the detailed steps to do so:
- Unit Testing: This tests individual units of code (like functions and methods) to ensure they work correctly in isolation. Use Unity Test Tools for unit testing within the Unity Editor.
- Integration Testing: Check how different parts of the game (like scripts, assets, and external libraries) work together. Address any conflicts or issues that arise when these elements interact.
- Functional Testing: Ensure every game feature works as intended in the game environment. Test on various iOS devices to cover different screen sizes and hardware capabilities.
- Performance Testing: Monitor FPS, memory usage, and CPU load to ensure the game runs smoothly. Use Unity Profiler and Xcode’s Instruments tool for detailed performance analytics.
- Compatibility Testing: Test your game on all supported iOS devices and OS versions. Ensure the game’s UI, controls, and features adapt well to different screen sizes and resolutions.
- Usability Testing: Conduct tests focusing on game controls, navigation, and overall user experience. Gather feedback on game design, difficulty levels, and user interface clarity.
- Setting Up TestFlight: Upload your game to App Store Connect and set it up for beta testing with TestFlight. Invite external testers by sharing a public link or adding their email addresses directly in App Store Connect.
- Collecting and Analyzing Feedback: Gather feedback from a diverse group of users. Monitor crash reports, performance metrics, and user feedback to identify and fix any issues.
- Submission and Apple Review: Ensure your game adheres to the latest App Store Review Guidelines. Compile all necessary metadata, descriptions, screenshots, and videos for your App Store listing.
- Submit Through App Store Connect: Finalize your App Store listing and submit your game for review through App Store Connect. Use Xcode or the Application Loader to upload your game’s binary to App Store Connect.
- Apple Review Process: Once submitted, your game will go through Apple’s review process. Be prepared to answer any questions from Apple’s review team and make necessary adjustments if your game is rejected.
Wrapping Up
Game developers venturing into Unity iOS game development often find it an overwhelming experience at the beginning. The comprehensive guide to the process can help developers learn all about Unity game development for the iOS platform.
At Juego Studios, you can hire Unity developers for all types of mobile platforms including the iOS platform. Our professionals can blend creativity with the latest technology to create a wide variety of games suitable for iOS mobile platforms.
Related Posts

Is Apple Vision Pro the Future of Gaming, Education, and the Modern Workplace?
The world, as we know it, is constantly evolving, and technology follows in its footsteps. But once in a while, there comes a product that alters the game. Apple Vision Pro is one such device.

A Guide to Designing a Successful Game App for iOS and Android
There is an incalculable number of fantastic game apps like Alto’s Odyssey, Blek, Brawlhalla, Genshin Impact, and Fortnite out there. So, how can you ensure that your game will make it large? Well, many will say, clean programming, new features, or maybe great graphics will help. But you know what? That’s what is done by […]

iOS Game Development Via Unity: A Guide For Beginners!
Mobile gaming is prevalent, irrespective of your device and operating system. With the global market share of iOS devices being approximately 28.8% till December 2023, it is the second most popular choice after Android.